Building a Klaytn bApp With Caver-js
Learn how to interact with a smart contract using Caver-js
In this tutorial, we're going to build a basic Klaytn bApp. We'll be using the Cavers-js library to build a simple frontend that interacts with our Solidity smart contract.
This tutorial is a minimal front-end implementation of the token contract explained in my previous article where we deployed an ERC20 token contract. If you're new to Klaytn or solidity smart contracts, check out How to build your first Smart Contract before proceeding with this article.
Introduction
Solidity smart contracts are self-executing, immutable programs that run on a decentralized network(blockchain) and are meant to be interacted with as such the need for a library as Caver-Js.
We can interact with our smart contracts on the blockchain in multiple ways. One way is to connect your bApp to a smart contract using the Caver-Js library.
In this article, we are going to be interacting with our previously deployed ERC20 smart contract by calling one of its functions and displaying its result on the front end.
What we would be building
We will work on creating a bApp x Defi that displays our current EML and KLAY balance, allow us to transfer EML to other wallet addresses, and finally display transfer transaction history.
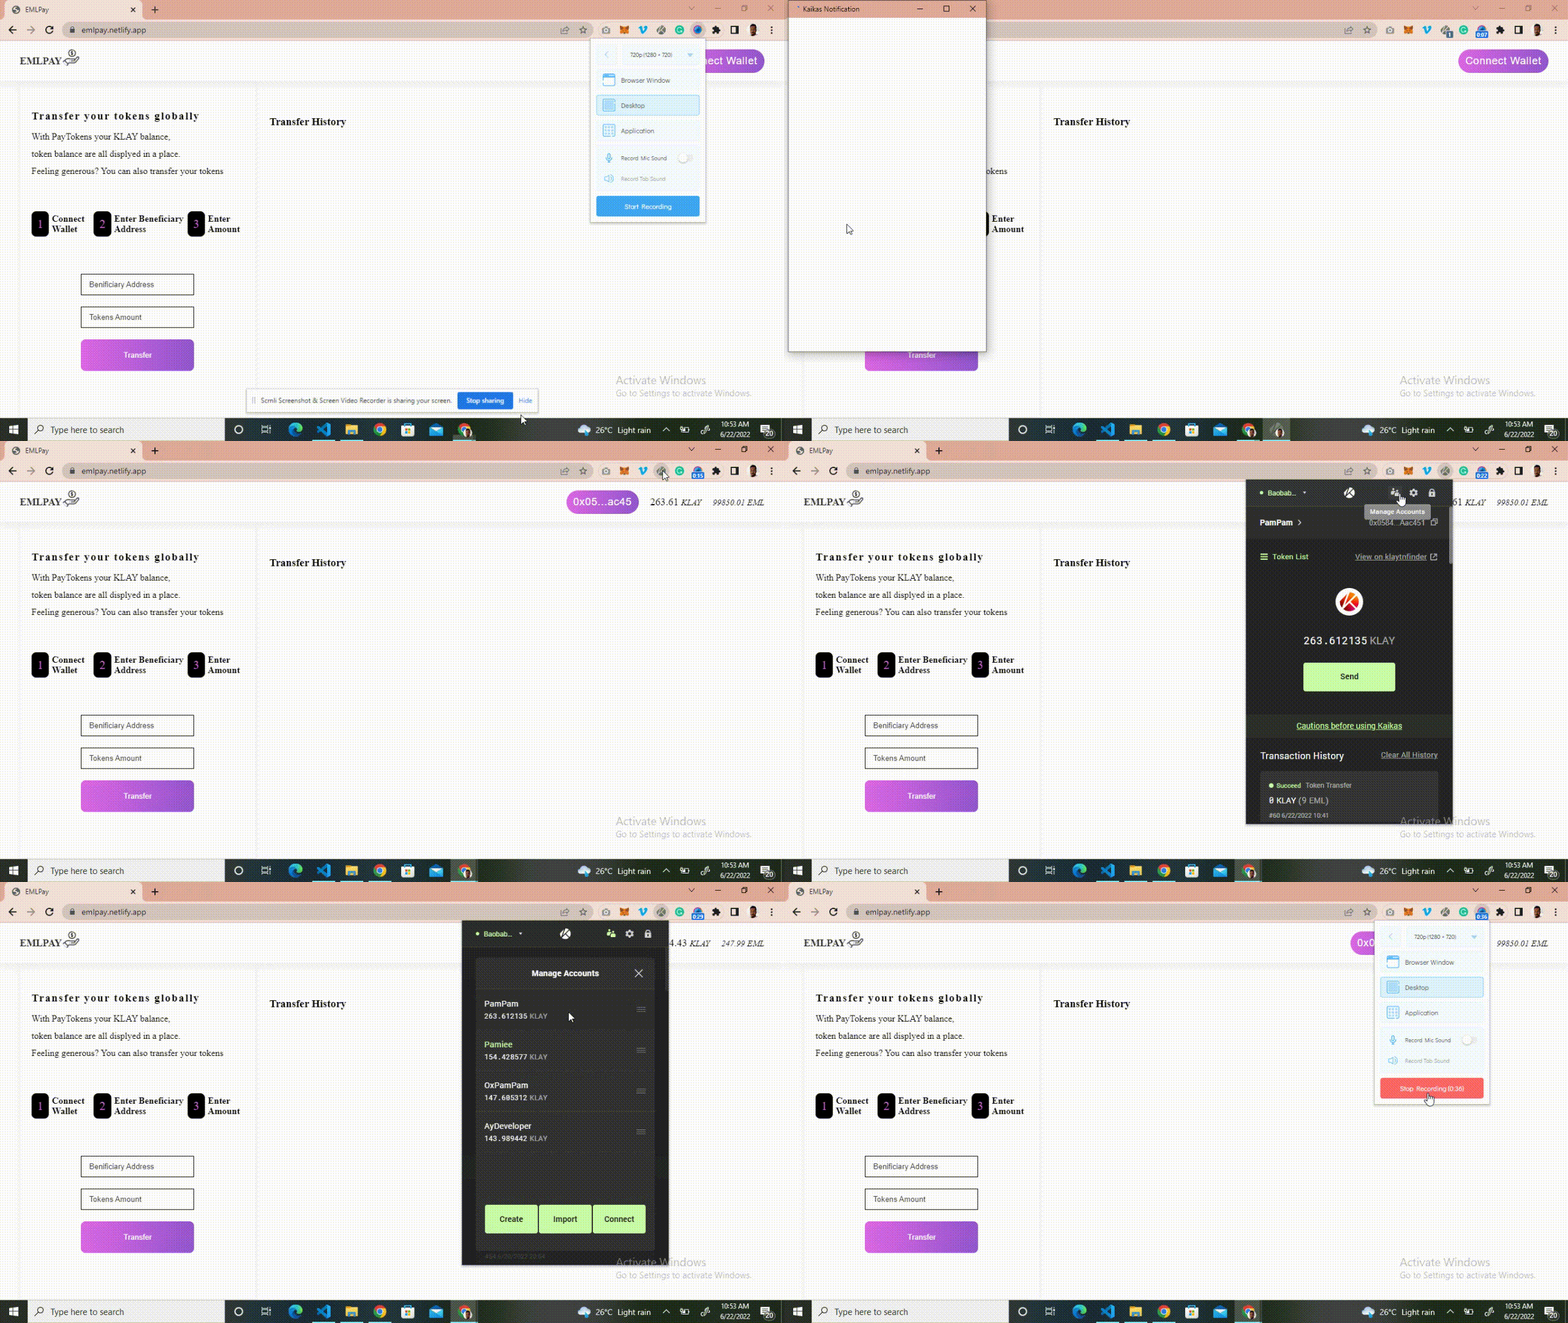
The final output will look like this:

Notice any changes in EML token balance? Yeah we transferred EML to a beneficiary
Prerequisites
To follow along with this article, you will need:
A basic understanding of HTML
A basic understanding of JavaScript and DOM
Kaikas wallet installed
Webpack usage
Here is a more detailed summary of what we gonna do:
Getting Started with Caver-Js
Building the Front-End
Testing Our bApp
Getting Started with Caver-Js
Caver-js is a JavaScript API library that allows developers to interact with a Klaytn node using an HTTP or WebSocket connection.
Publicly exposed JSON-RPC endpoints allow you to test and run your blockchain products by providing interaction with the Klaytn network without running your own node. Using these endpoints with caver-js helps us connect to the klaytn network. Read more here
caver-js is available as an npm package and can be installed by running:
npm i caver-js
If you are working with Node.js, you can import the Cavers-js package in your project with:
const Caver = require('caver-js')
const caver = new Caver('api.baobab.klaytn.net:8651/');
For an ES6 or TypeScript-based project, you can import it with:
import Caver from 'caver-js';
That's all it takes to include caver-js in your project. Now let's take a look at some methods you would come across while working with caver-js which were used in our project.
A.
window.klatyn !== 'undefined'
The above line of code helps us check if the user is using the Kaikas wallet or not.
B.
window.klaytn.networkVersion == '8217'
This tells us which network the user is currently connected to. This can either be Cypress or Baobab. The above checks if it is connected to the cypress network.
C.
await klaytn.enable()
This method helps us connect users to Kaikas meaning you can now get access to users' Klaytn accounts.
D.
const accounts = await klaytn.enable()
const account = accounts[0]
This promise-returning function resolves with an array of hex-prefixed Klaytn addresses that have connected to kaikas, which can be used when sending transactions. We eventually use a single account as provided above.
E.
const balance = await this.caver.klay.getBalance(account)
This method returns the selected account's current balance.
F.
caver.utils.fromPeb(balance, 'KLAY')
This method converts peb "the smallest KLAY unit" to "KLAY". This is done only for display reasons.
G.
klaytn.on('accountsChanged', function(accounts) { // Your code })
The above helps us with account changes i.e when a user switches to another account. It gets us notified when the address changes.
H.
caver.utils.isAddress(addr)
This method checks if a given string is a valid Klaytn address.
I.
caver.utils.convertToPeb(amount, 'KLAY')
This method converts any KLAY value into peb.
J.
const myContract = new caver.klay.Contract(contractABI, contractAddress)
This method is used to easily deploy and interact with contracts on blockchain.
K.
myContract.methods.MethodName(args).call() .then(result => { console.log(result) })
This method will call and execute its smart contract method in the Klaytn Virtual Machine without sending any transaction. This in turn cannot alter the state of the smart contract
L.
myContract.send({from: selectedAccount, gas: 1500000, value: 0}, 'methodName', args) .then(result => { console.log(result)
}) .catch(err => { console.log(err); })
This method submits a transaction to execute the function of the smart contract. it can in turn alter the state of the smart contract.
That would be all for some of the methods. Note, if you are familiar working with web3.js, you can as well build using caver-js. To fully explore the functionality of the library, check out the docs.
Now that we have covered some methods, lets build out the frontend!
Building the Front-End
We would be building the core functional part of the bApp together. And i will like to split it into two:
Connect wallet button
Transfer button
You can customize and style your bApp whichever way you want it!!
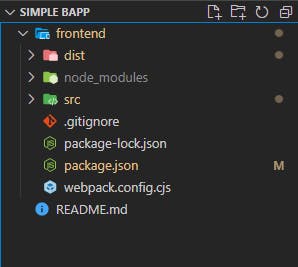
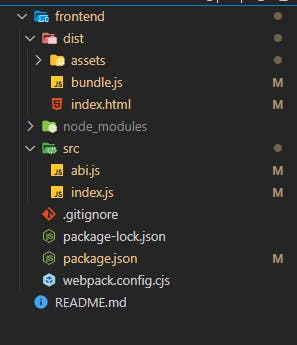
Before going into that, i would love to quickly talk about using webpack. If you are familiar using it then goodluck! If you re not then navigate to the docs. So we have our project structured like this below


Yay! Now that you have done that, lets open src/index.js and write all our bApps functionality. This would all be bundled up in dist/bundle.js which is referenced in our dist/index.html
A. Connect Wallet Button
HTML in dist/index.html
     <div class="connect">
                <button>Connect Wallet</button>
                <div class="balDisp"></div>
                <div class="tokenBal"></div>
       </div>
JS in dist/index.js
   const connectBtn = document.querySelector('.connect button');
   connectBtn.addEventListener('click', e => {
        init();
   })
init function
// stores selected account
let selectedAccount;
// state of initialization
let initialized = false;
let emlContract;
// eml token contract address
const emlContractAddress = "0x79a0a2917034afe98b7d6bac58447d4a80723c0b";

const init = async () => {
       // checks if kaikas is available;
    if (window.klatyn !== 'undefined') {
       // checks connected network
        if (window.klaytn.networkVersion == '8217') return console.log('Change to BaoBab')
       // connects the user to kaikas
        const accounts = await klaytn.enable();
       // gets the connected account
        const account =  accounts[0];
        selectedAccount = accounts[0];
         // gets the KLAY balance of the provided address
        const balance = await cav.klay.getBalance(account);
        setUserInfo(account, Number(caver.utils.fromPeb(balance, 'KLAY')).toFixed(2));
        // subscribe to changes in account
        klaytn.on('accountsChanged',  async (accounts) => {
            // function that sets users address and Klay balance
            setUserInfo(accounts[0], Number(caver.utils.fromPeb(await cav.klay.getBalance(accounts[0]), 'KLAY')).toFixed(2));
            selectedAccount = accounts[0];
            getTokenBalance(selectedAccount)
        })
    }
    // setting the instance of the contract
     emlContract = new cav.klay.Contract(abi, emlContractAddress);
     initialized = true;
     // fetching and setting EML balance
     getTokenBalance(selectedAccount)

}
setUserInfo
    function setUserInfo(account, balance) {
       connectBtn.innerText = addressShortener(account);
       balDisp.style.display = 'block';
       balDisp.innerHTML = `${balance} <span>KLAY</span>`;
}
getTokenBalance
   const  getTokenBalance = async (addr) => {
      // checks if it has been initialized, else initialize it
       if (!initialized) {
            await init();
        }
  // calls the balanceOf function in the eml token contract
  // this returns uint
  emlContract.methods.balanceOf(addr).call()
    .then(result => {
        const tokenBal = document.querySelector('.tokenBal');
        tokenBal.style.display = "block"
        tokenBal.innerHTML = `<span>${formatValue(result).toFixed(2)} EML</span>`
    })
 }
Some things to put in mind
- emlContract = new cav.klay.Contract(abi, emlContractAddress)
This helps us set the instance of the eml token contract. This gives us access to call the contract functions as such we would need its ABI and contract address as seen above. The contractAddress which houses the contract code has been provided. While the ABI which is the json representation of all contracts function can be gotten here
After we have that set, when we click our connect wallet button, we should have this result

B. Transfer button
HTML in dist/index.html
   <form class="submisionForm">
           <div>
                <input type="text" name="addr" id="addr" placeholder="Benificiary Address" required>
            </div>

             <div>
                   <input type="number" name="amount" id="amount" placeholder="Tokens Amount"
                        required>
              </div>
              <div class="submit">
                    <input type="submit" value="Transfer">
              </div>
     </form>
JS in dist/index.js
const submisionForm = document.querySelector('.submisionForm');

submisionForm.addEventListener('submit', async (e) => {
    e.preventDefault();
    const addr = submisionForm.addr.value;
    const amount = submisionForm.amount.value;
    Transfer(addr, amount).then(tx => {
    }).catch(err => {
        console.log(err);
    })
})
Transfer Function
    const Transfer = async (addr, amount) => {
        if (!initialized) {
            await init();
        }

    // checks if the address is a klaytn address
   const recAddr = caver.utils.isAddress(addr);
   // converts amount to peb
   const val = caver.utils.convertToPeb(amount, 'KLAY')

   if(recAddr != true) {
    alert("Invalid Address");
    return;
   }

    // sends transaction to the contract
    emlContract.send({from: selectedAccount, gas: 1500000, value: 0}, 'transfer', addr, val)
    .then(result => {
        // store events emtted to be displayed in transfer history
        const events = result.events.Transfer.returnValues;
        const from = events.from;
        const to = events.to;
        const value = events.value;
        // displays message in transfer history section
        displayMessage("00",`Yay! you ${addressShortener(from)} transferred ${formatValue(value)} EML Tokens to ${addressShortener(to)}`);
         // displays token balance after transfer
        getTokenBalance(selectedAccount);

    })
    .catch(err => {
        displayMessage("01", `Transaction reverted, see console for details`);
        console.log(err);
    })
}
displayMessage function
  function displayMessage(messageType, message){
    const messages = {
        "00":` <div class="card">
                <p class="successMessage">${message}</p>
            </div>`,
        "01": `
            <div class="card">
                 <p class="errorMessage">${message}</p>
            </div>
        `
    }
    const notification = document.querySelector(".projectContainerCenter");
    notification.innerHTML += messages[messageType];
}
That's all for the major functionalities.
And our app is ready to go!
To try the bApp out, you need to have some EML tokens. Drop your klaytn address in the comment section so I can transfer some to you. To get your klaytn address, read this guide
Also, the full source code is available here on GitHub for a full grasp and also to check some of the helper functions used.
Testing our bApp

The live link to our bApp is here
Conclusion
Congratulations on making it until the end!
In this tutorial, we did learn about interacting with smart contracts and also learnt how to create a blockchain application (bApp) on Klaytn using caver-js.
If you have any questions, suggestions or comments, drop them below, or reach out to me on Twitter!
Happy Buidling!!!!
