Create and Deploy Your First Smart Contract With Klaytn IDE
In this article, we would learn how to write a simple smart contract, write test for few cases and deploy to Baobab using Klaytn IDE and Kaikas Wallet

Introduction
Are you just getting started with smart contracts development and would love to build one and deploy it on the Klaytn Chain but don't know how to get started?
This tutorial was made definitely for you. Together, we’re gonna go through the creation and deployment of your very first smart contract to the Klaytn Blockchain.
It is important to note that everything will be done directly in your browser and no need to set anything in your local development environment. In fact, we will be using a web-based IDE: Klaytyn IDE, to write and deploy our smart contract.
What's a Smart Contract?
It is super important to understand what smart contracts are: here is a short definition of smart contracts
Smart contracts are self-executing, immutable programs that run on a decentralized network(blockchain)
So the purpose of this article is to write some code and deploy it to the klaytn chain!
Here is a more detailed summary of what we gonna do:
Get familiar with Klaytn IDE
Write a basic smart contract
Compile our contract
Add a few tests to our smart contract
Deploy our smart contract to the Baobab network
Interact with our deployed smart contract from Remix
Conclusion
Getting Familiar with Klaytn IDE
"Klaytn IDE is an open-source web application for compiling and deploying Klaytn smart contracts. It fosters a fast development cycle and has a rich set of plugins with intuitive GUIs. Klaytn IDE is a major tool for contract development as well as act as a playground for learning and teaching smart development in Klaytn.”
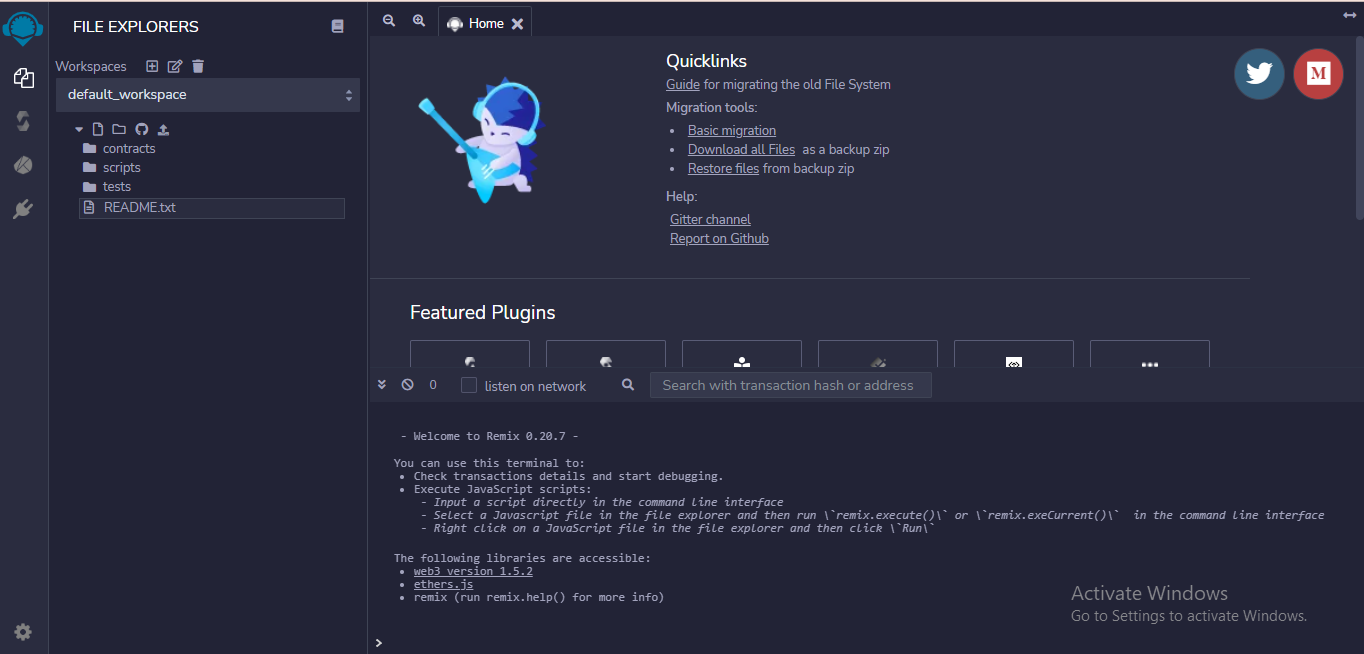
This pretty much looks like Remix IDE right? yeah, it is but with little modifications. In the sidebar, you have 4 tabs, for now:
The file explorer, as seen in the picture above. This is where we’re going to write our smart contract and its test file. It should be pre-filled with some files already. Feel free to go through them!
The Solidity compiler. This is where we will compile our smart contract, once it is ready.
The Deploy and Run Transactions, which is, you guessed it, where we will deploy our smart contract to the Blockchain.
The Plugin Manager, which helps us get different plugins provided by Remix for faster development
There is not much more to add than this for now… Let’s work!!
Write a Basic Smart Contract
I thought it would be fun to write a simple bank smart contract that will enable people to store KLAY and send out to recipients on the Blockchain!
The smart contract will be really simple. It will have three functions:
The first function allows users to deposit KLAY in the KlayBank Contract,
The second function allows users to withdraw KLAY to a recipient address the stipulated amount.
The third function allows users to check the balance of any address
Let’s get started!
Create a new file in the contracts folder and name it KlayBank.sol.
Then, add the first lines of code to our contract in it:
   // SPDX-License-Identifier: MIT
   pragma solidity ^0.8.0;

   contract KlayBank {

    }
So let us break things down
The first line shows the license declaration. A one-line pre-defined comment that states how can others use (or not use) your source code. It is not mandatory to have this line but the Solidity Compiler will throw a warning if we don’t declare any license.
The line that follows is the directive that specifies the compiler version to be used for the current solidity file. You got it, we will use version 0.8.0.
Finally, our contract declaration starts with the word contract. Looks pretty much like a Class declaration in many programming languages.
Add a mapping of balance
So we want to be able to store the balance of users in the bank. This is done by creating a mapping of address to uint as seen below
  // SPDX-License-Identifier: MIT
  pragma solidity ^0.8.0;

contract KlayBank {
    mapping(address => uint) balances;
}
Add the deposit function
What we are doing here is pretty straightforward. We increase the balance of msg.sender by the msg.value sent in. This is possible because we made the function payable.
    // SPDX-License-Identifier: MIT
    pragma solidity ^0.8.0;

   contract KlayBank {
    mapping(address => uint) balances;

    function deposit() public payable {
        balances[msg.sender] += msg.value;
    }

   }
msg.sender & msg.value
These two aren’t declared anywhere so where are they coming from? They are Global Variables.
msg.sender will always be equal to the address where the call came from (the user in our case).
msg.value represents the number of wei sent with the message.
Add the Withdraw Function
// SPDX-License-Identifier: MIT

pragma solidity ^0.8.0;

contract KlayBank {
    mapping(address => uint) balances;

    function deposit() public payable {
        balances[msg.sender] += msg.value;
    }

    function withdraw(address _recipient, uint _amount) public {
        require(_recipient != address(0) ,"KlayBank: Cannot Send to Address Zero");
        require(_amount <= balances[msg.sender], "KlayBank: Insufficient Balance");

        balances[msg.sender] -= _amount;
        balances[_recipient] += _amount;
    }

   }
The withdrawal functions make use of the Check-Effect_Interaction Pattern and can be explained below :
The require statements that check if the recipient does not equal to address zero and the amount to be sent is lesser than the user balance.
the balances mapping that reduces the user's balance and increases the recipient's balance.
Add GetBalance method
What we are doing here is pretty straightforward. We return the balance of the address passed in.
    // SPDX-License-Identifier: MIT

pragma solidity ^0.8.0;

contract KlayBank {
    mapping(address => uint) public balances;

    function deposit() public payable {
        balances[msg.sender] += msg.value;
    }

    function withdraw(address _recipient, uint _amount) public {
        require(_recipient != address(0) ,"KlayBank: Cannot Send to Address Zero");
        require(_amount <= balances[msg.sender], "KlayBank: Insufficient Balance");

        balances[msg.sender] -= _amount;
        balances[_recipient] += _amount;
    }

    function getBalance(address _addr) public view returns(uint) {
        return balances[_addr];
    }

}
Compile our Smart Contract
Let's quickly compile our contract to a language the EVM understands (bytecodes). To do this Keep the KlayBank.sol file open and click on the Solidity Compiler tab in the sidebar.
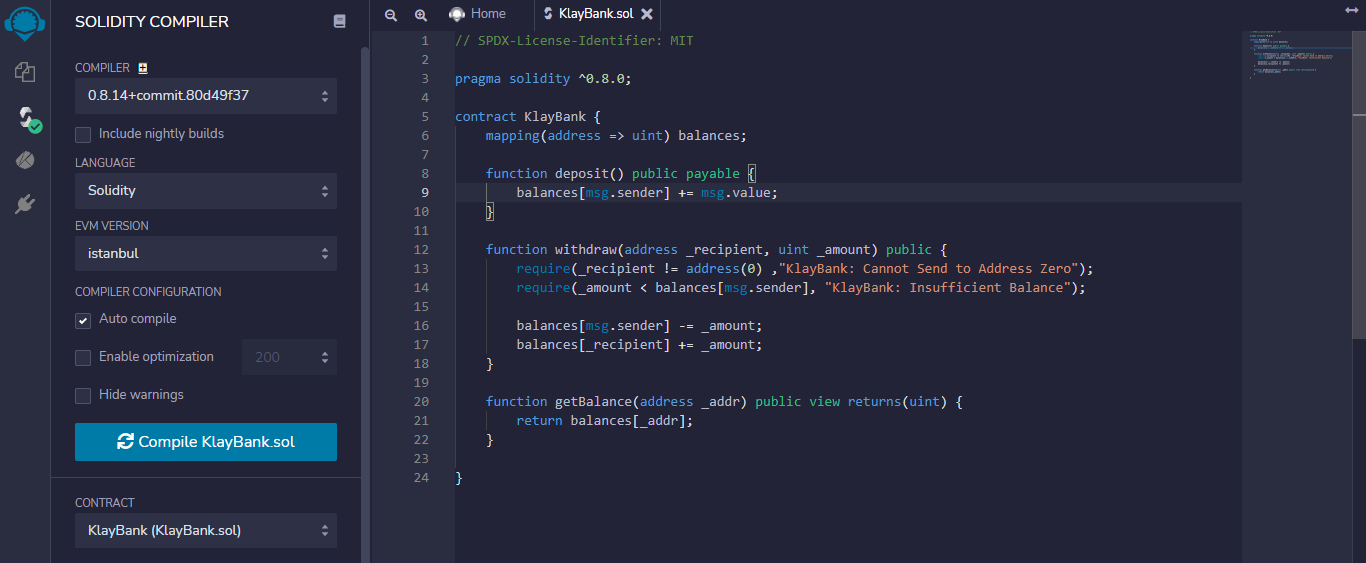
Solidity is a high-level language and as such needs to be compiled into a language understood by the EVM. This is the more reason why we need to compile our .sol file so the EVM can execute and invoke its function.
Add a Few Tests to Our Smart Contract
Writing test for our contracts is pretty much important as we can’t just deploy our contract and fix it later if a bug is found, that’s not advisable and literally impossible because of the immutability of the blockchain.
Remix offers the possibility to write and run tests. Let’s add a test file so we can ensure that our smart contract works as intended before deploying it.
Come back to the File Explorers and under the tests folder, create a new file named KlayBank_test.sol.
Fill it with this code:
   // SPDX-License-Identifier:MIT

pragma solidity >=0.7.0 <0.9.0;
import "../contracts/KlayBank.sol";

contract KlayBank_Test {

    KlayBank klayBank;

    function beforeAll () public {
        klayBank = new KlayBank();
    }

    function checkDepositedValue () payable public {
        klayBank.deposit{value: msg.value}();
        Assert.equal(klayBank.balances(msg.sender), uint(uint(msg.value)), "BankTest: Deposit amount should be equal msg.value");
    }

     function checkWithdraw() payable public {
        klayBank.deposit{value: msg.value}();
        uint amount = msg.value;
        klayBank.withdraw(0xF0C566F40Aa7fbe55cF5E3B0ba1d168F3a4ad67F,amount);
        uint ownerBal = klayBank.balances(msg.sender);
        uint recipientBal = klayBank.balances(0xF0C566F40Aa7fbe55cF5E3B0ba1d168F3a4ad67F);
        Assert.equal(klayBank.balances(msg.sender), uint(ownerBal - amount), "BankTest: Owner balance should reduce");
        Assert.equal(klayBank.balances(0xF0C566F40Aa7fbe55cF5E3B0ba1d168F3a4ad67F), uint(recipientBal + amount), "BankTest: Recipient balance should increase");

    }


}
Nothing really complex in this file. It’s essentially making sure that when users deposit, it is stored in the balance of msg.sender, and that when users withdraw, the balances of owner and recipient decreases and increase respectively.
Run our test file
In the sidebar, click on the Solidity Unit Testing tab.
Is this tab missing? Click the plugin manager at the bottom of the sidebar. Search for Solidity Unit Testing and activate this plugin.
Select the KlayBank_test file then click on the run button. The tests for our smart contract will run and hopefully pass!
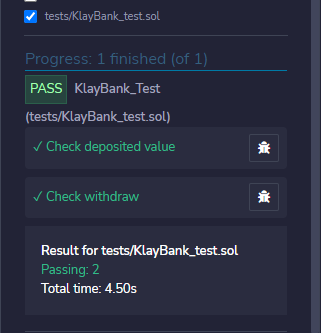
Yay, it passed!!💃💃 Now its time to deploy our contract to the Baobab Network
Deploy Our Smart Contract to the Baobab Test Network
As previously said, the blockchain is immutable. A deployed smart contract can’t be modified anymore. While we’ve covered our KlayBank smart contract with a few tests, it might not be wise to deploy it to Klaytn Mainnet (Cypress) yet.
For this guide, we would be deploying our smart contract to a test network.
There are what we call Testnets (Test network). Baobab is klaytn main test network. A testnet is an environment that is pretty much like Mainnet, despite the fact that it’s here to act as a sandbox.
It’s a testing environment, that can be used to run your smart contract in almost real conditions, without involving real assets (we will see in a bit that we will still use KLAY, but fake KLAY!).
Now that you know more about why we want to deploy to Baobab first, here are the steps to get started:
Note that the steps to deploy to Klaytn Mainnet are exactly the same as the ones that we follow here.
Install Kaikas
We would need Kaikas to sign and send transactions, so make sure that it is installed. Don't know how to go about it, you can read this guide here
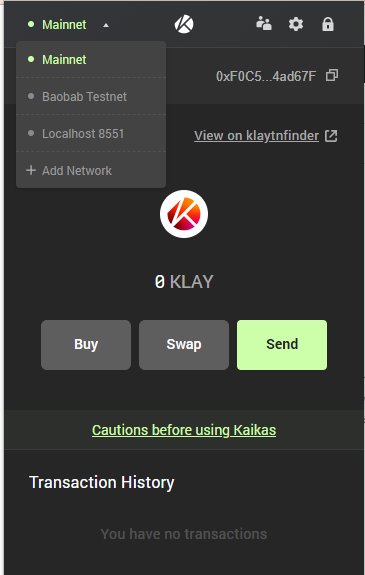
Select the Baobab network
Kaikas allows us to change the environment in one click. By default, it is connected to Mainnet, let’s switch it to Baobab.
Where to get KLAY to deploy our smart contract
As we now know, Baobab works as Cypress. Meaning that we still need to pay gas to deploy our contract. And to pay for the gas, we need KLAY… “Test KLAY”.
We can get some KLAY to play with from faucets.
Here is a faucet to get some Test KLAY in your wallet.
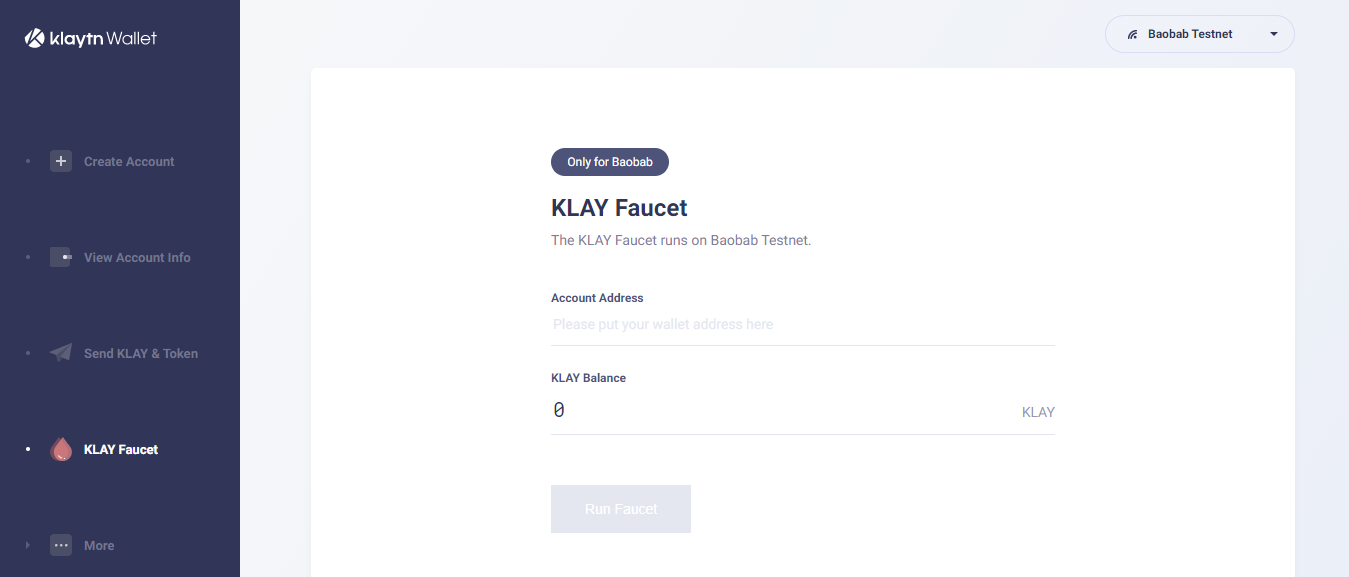
Copy and paste the wallet address you want to use to deploy your smart contract and click on Run Faucet. In a few seconds you should have received around 135 test KLAY.
Let’s deploy our smart contract
Head back to Remix, and go to the Deploy and Run Transactions page.
Now before we do anything, it is important to add an account to remix as it is empty by default as seen below
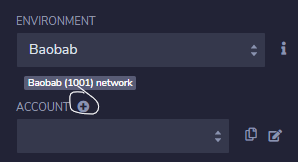
To do this, click on the plus sign as circled in the image above. This brings out a modal to insert the private key of your account on Kaikas. In order to do this, go back to your wallet, and click on account details to copy your private key. Once this is done, paste it into the section provided by remix. You can repeat this method to add multiple accounts.
Finally, let's deploy our smart contract!!
Make sure your account has been selected and the contract you want to deploy!
Click on deploy!!
After a few seconds, your terminal displays a success message like this

To view the transaction on Klaytnscope, copy the address of the already deployed contract and paste it into the block explorer, then click on the transaction hash.

Congratulations 🎉🎉, you’ve deployed a smart contract to Baobab!
Interact With Our Deployed Smart Contract From Klaytn IDE
Let's head back to our IDE. There should now be a deployed contracts panel in the Deploy & Run Transactions tab:
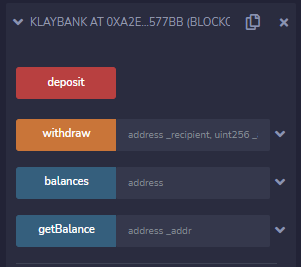
Awesome! There are three functions that we created in our KlayBank smart contract: deposit, withdraw and getBalance. There is an addition of balances because of the public visibility added to it.
Deposit KLAY!
To deposit KLAY, we need to fill the amount of KLAY to be deposited as done below
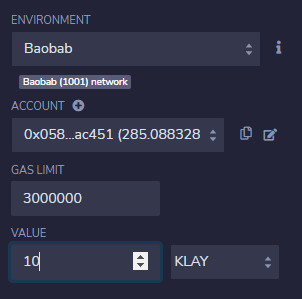
This is so because we made the deposit function payable remember? So we would be depositing 10 KLAY in to the KlayBank contract in this example. After inputting the amount just click on the deposit button.
Withdraw KLAY
To withdraw, we need to pass in the address of the recipient and the amount also as done below
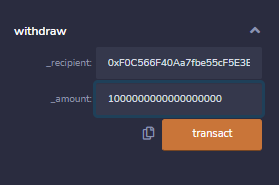
Note: the amount inputted represents 1 KLAY because it is a 18-decimal currency [1000000000000000000], so 10 KLAY would be 10000000000000000000 you guessed it right
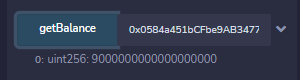
GetBalance
This function returns the balance of the user in peb: the smallest denomination of KLAY.
Note the address of the depositor returns 9000000000000000000 and the address of the recipient shows 1000000000000000000
depositors balance
recipient balance
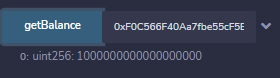
This shows that our contract is intact and KlayBank works!!
Conclusion
Congratulations for making it until the end and for writing and deploying your first smart contract on Klaytn Baobab Network with Klaytn IDE.
Now that you have fully gone through the process, it’s time to experiment more! Can you think of anything that could be improved? Here is an idea:
Currently, a user can deposit any amount how about restricting the deposit value to 1 KLAY? Sounds cool right? Here is how the deposit function could be modified:
  function deposit() public payable {
        require((msg.value >= 1 * 10**18), "Bank: Minimum deposit value is 1 KLAY");
        balances[msg.sender] += msg.value;
    }
This was a very comprehensive first step in creating and deploying your first smart contract on Baobab with Klaytn IDE. Even though we did not really go into solidity basics and all. You can check out solidity docs
If you have any questions, suggestions or comments, drop them below, or reach out to me on Twitter!
Happy Buidling!!!!


