How to set up a Hardhat project for Klaytn
Learn how to use and set up Hardhat, compile, test and deploy smart contracts to Klaytn considering it's fixed gas price model.

Introduction
Building on Klaytn is pretty much the same as building on Ethereum!
You must have seen that in one of my previous articles.
This statement is valid because Klaytn is a Layer one EVM solution and it fully supports features for Ethereum Equivalence. Ethereum Equivalence I mean Ethereum tools can be used on Klaytn without any substantial modifications. These tools include Hardhat, Truffle, ethers js and web3 js.
Having said that, it is important to note that, unlike Ethereum, Klaytn makes use of a fixed gas price model. This means developers would need to be extra careful when using Ethereum native tooling for they have to set the right amount of gas when creating a transaction.
The need to put this into consideration when using Ethereum tools on Klaytn is the reason behind this article. Here I will explain how to set up a hardhat project, test and deploy it to klaytn putting into consideration the Klaytn compatible gas price using Hardhat and ethers js.
So let's get started! In this tutorial, we’ll go through the following:
- What is Hardhat?
- Installing Hardhat
- Creating and configuring a new Hardhat project
- Writing, testing, compiling and deploying smart contracts
- Conclusion
Prerequisites
To follow this tutorial, you should have knowledge in:
Not familiar with the above? Learn the basics by clicking the links above, before proceeding with this tutorial on how to set up a hardhat project.
What is Hardhat
Hardhat is basically a development environment to compile, deploy, test and debug Ethereum smart contracts. Hardhat has a built-in Hardhat Network (like Ganache, your local blockchain) designed for development. It's also notable for solidity debugging featuring stack traces, console.log() and explicit error messages when transactions fail.
Installing Hardhat
To get started you need a working Node.js >= 12.0 version installed. You can skip this if you already have it installed.
Now let's install Hardhat using the npm CLI. Open a new terminal and run the below command
   mkdir klaytn_Hardhat_Example
   cd klaytn_Hardhat_Example
   npm init --yes
   npm install --save-dev hardhat
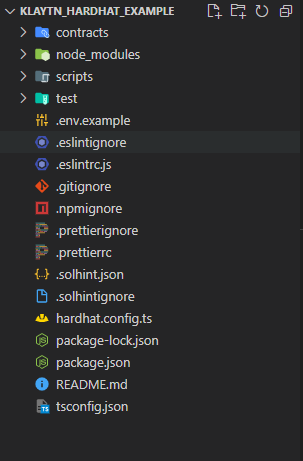
Creating and configuring a new Hardhat project
After successful installation, in the same directory where you installed hardhat, run
npx hardhat
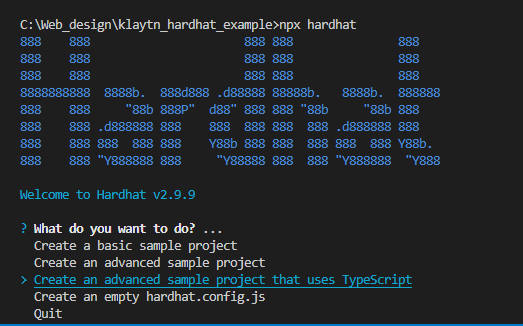
Your terminal would look like the above after running the command. For this guide please do select the Create an advanced sample project that uses TypeScript which looks like this after pressing enter
A. Configure package.json to install all dependencies
Navigate to package.json file, and paste the following dependencies for installation
   {
  "name": "hardhat-project",
  "devDependencies": {
    "@nomiclabs/hardhat-ethers": "^2.0.3",
    "@nomiclabs/hardhat-etherscan": "^2.1.8",
    "@nomiclabs/hardhat-waffle": "^2.0.1",
    "@typechain/ethers-v5": "^7.2.0",
    "@typechain/hardhat": "^2.3.1",
    "@types/chai": "^4.3.0",
    "@types/mocha": "^9.0.0",
    "@types/node": "^16.11.17",
    "@typescript-eslint/eslint-plugin": "^4.33.0",
    "@typescript-eslint/parser": "^4.33.0",
    "chai": "^4.3.4",
    "dotenv": "^10.0.0",
    "eslint": "^7.32.0",
    "eslint-config-prettier": "^8.3.0",
    "eslint-config-standard": "^16.0.3",
    "eslint-plugin-import": "^2.25.3",
    "eslint-plugin-node": "^11.1.0",
    "eslint-plugin-prettier": "^3.4.1",
    "eslint-plugin-promise": "^5.2.0",
    "ethereum-waffle": "^3.4.0",
    "ethers": "^5.5.2",
    "hardhat": "^2.9.1",
    "hardhat-gas-reporter": "^1.0.6",
    "prettier": "^2.5.1",
    "prettier-plugin-solidity": "^1.0.0-beta.13",
    "solhint": "^3.3.6",
    "solidity-coverage": "^0.7.17",
    "ts-node": "^10.4.0",
    "typechain": "^5.2.0",
    "typescript": "^4.5.4"
  },
  "dependencies": {
    "@openzeppelin/contracts": "^4.4.1",
    "@chainlink/contracts": "0.2.1",
    "mocha": "^9.2.1"
  }
}
After pasting this, run
npm install
Check out the full project source code on GitHub
B. configure the .env file
Navigate to the .env file. This file helps us load environment variables from a .env file into process.env. You would have to rename the file from its default to .env as seen below
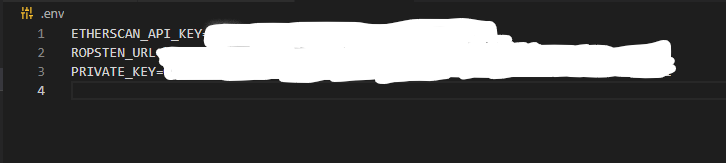
let's configure our .env file to look like this
 KLAYTN_URL='https://api.baobab.klaytn.net:8651'
 PRIVATE_KEY= your private key copied from kaikas wallet
In doing this, we would make some changes to our hardhat.config.ts file in later steps
C. Configure the hardhat.config.ts file
Navigate to the hardhat.config.ts file. This contains an object to be exported which by default has entries like solidity, networks, gasReporter, etherscan. We can see that below:
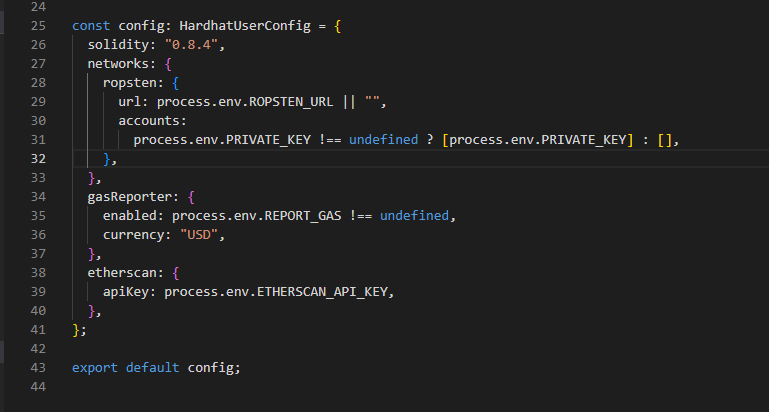
Now lets configure our file to look like this considering the changes in our .env
    const config: HardhatUserConfig = {
  solidity: "0.8.4",
  networks: {
    klaytn: {
      url: process.env.KLAYTN_URL || "",
      gasPrice: 250000000000,
      accounts:
        process.env.PRIVATE_KEY !== undefined ? [process.env.PRIVATE_KEY] : [],
    },
  },
  gasReporter: {
    enabled: process.env.REPORT_GAS !== undefined,
    currency: "USD",
  },
  etherscan: {
    apiKey: process.env.ETHERSCAN_API_KEY,
  },
};
We would notice that I added a gasPrice property to the object. This is a result of the fixed gas price model I talked about previously. So this is how klaytn gas configuration is done when using hardhat to deploy or send transactions to the network. You can read more about it here
Some things to put in mind after configuring your file
- Solidity
The solidity config is an optional field that is used to set the compiler version and some other things like optimizers et al.
- Network configuration
The networks config field is an optional object where network names map to their configuration.
There are two kinds of networks in Hardhat: JSON-RPC based networks, which is what we will be using in this tutorial, and the built-in Hardhat Network. Note, If you omit this config, it uses "hardhat" as its default value.
Now that we are done with the configuration let's head to writing and deploying our actual smart contracts
Writing, testing, compiling and deploying smart contracts
In this tutorial, we’re going to create a simple smart contract that works like a bank. Users can deposit money and withdraw their funds.
i. Creating the smart contract
Navigate to your contracts folder and create a new file called KlayBank.sol
contracts/KlayBank.sol
Copy and paste the code below into your newly created solidity file.
   // SPDX-License-Identifier: MIT

pragma solidity ^0.8.0;

contract KlayBank {
    mapping(address => uint) public balances;

    event depositEvent(uint _amount, address _depositor);
    event withdrawEvent(uint _amount, address _depositor, address _beneficiary);

    function deposit() public payable {
        balances[msg.sender] += msg.value;
        emit depositEvent(msg.value, msg.sender);
    }

    function withdraw(address _recipient, uint _amount) public {
        require(_recipient != address(0) ,"KlayBank: Cannot Send to Address Zero");
        require(_amount <= balances[msg.sender], "KlayBank: Insufficient Balance");

        balances[msg.sender] -= _amount;
        balances[_recipient] += _amount;

        emit withdrawEvent(_amount, msg.sender, _recipient);
    }

    function getBalance(address _addr) public view returns(uint) {
        return balances[_addr];
    }

}
Code walkthrough
In solidity code, the first line is usually the pragma. This declares the version of Solidity you wish to write your code in.
The next is the declaration of contract keyword, then the name of the contract. Here, our contract name is KlayBank.
Next, I declared a mapping of balances which maps an address to a unit i.e an EOA to its account balance which is populated when deposit or withdrawals takes place.
Next, I declared both the deposit and withdraw event to be emitted when the deposit and withdraw functions are been called.
Deposit Function
The deposit function is declared payable which means it can receive ethers. The line balances[msg.sender] += msg.value; assigns the money sent into the balance of the person calling the function (msg.sender). It finally emits the deposit event after the state change.
Withdraw Function
This takes in two parameters: the beneficiary address and the amount to be transferred. Moving forward we have some require statements that checks:
a. not sending to address zero
b. not sending the funds when the amount is greater than the user's available balance
The effect here is reducing the payer's balance and increasing the beneficiary's respectively. Lastly, the withdraw event is emitted after these state changes.
getBalance Function
This is a view function that returns the balance of the msg.sender
ii. Compiling the smart contract
To compile the contract, open up your terminal and run
npx hardhat compile

Our contract has been successfully compiled and it’s ready for use.
iii. Testing our contract
The absolute smartest thing you can do is write automated tests when building smart contracts. This will help guarantee your users' money is safe. In this tutorial, we would be making use of hardhat and mocha.
To test the contract, we need to get the contract address by deploying to hardhat localhost.
Navigate to the scripts folder and open the deploy.ts
scripts/deploy.ts
Copy and paste the following code in it
import { ethers } from "hardhat";

async function main() {
//   We get the contract to deploy
  const Bank = await ethers.getContractFactory("KlayBank");
  const bank = await Bank.deploy();
  await bank.deployed();
  console.log("Bank deployed to:", bank.address);
}
main().catch((error) => {
  console.error(error);
  process.exitCode = 1;
});
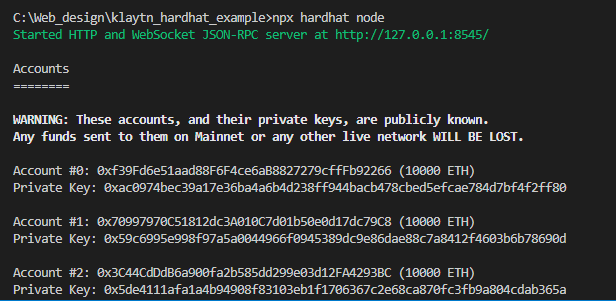
Open up a new terminal to run Hardhat in-built Network by running
npx hardhat node
Now that we have our hardhat node set up, let's deploy!
To deploy, run
npx hardhat run scripts/deploy.ts --network localhost

Now that we have our contract deployed, copy the contract address and paste it into your test file. Note we are still going to be interacting with our already deployed contract in later steps
Testing your contract
Navigate to your test folder and open up the index.ts file
test/index.ts
Copy and paste the code below into your test file
import { expect } from "chai";
import { ethers } from "hardhat";
import { KlayBank } from "../typechain";


let klayBank:KlayBank;


const deployedContract :string = "your deployed contract address";

describe("Get instance of KlayBank", function () {
  before(async function () {
    klayBank = await ethers.getContractAt("KlayBank", deployedContract) as KlayBank
  })
it("user balance should increase on deposit", async function () {
  const signer = await ethers.getSigners();
  const _depositor1 = signer[0].address
  const _depositorSigner = await ethers.getSigner(_depositor1);

  const balance: any = await klayBank.getBalance(_depositor1);

  const option = {value: ethers.utils.parseEther("1")}
  const deposit: any = await klayBank.connect(_depositorSigner).deposit(option);
  const tx = await deposit.wait();
  const value = tx.events[0].args[0]
  const depositor = tx.events[0].args[1];

  const balanceAfter: any = await klayBank.getBalance(_depositor1);

  expect(Number(balance.toString()) + Number(value.toString())).to.equal(Number(balanceAfter.toString()))
  expect(_depositor1).to.equal(depositor)
});

it("user and recipient balance should reduce and increase on withdraw respectively", async function () {
  const signer = await ethers.getSigners();
  const _depositor1 = signer[0].address
  const _depositorSigner = await ethers.getSigner(_depositor1);

  const balance: any = await klayBank.getBalance(_depositor1);
  const recipientBalB4: any = await klayBank.getBalance(signer[1].address);


  const withdraw: any = await klayBank.connect(_depositorSigner).withdraw(signer[1].address, "5000000000");
  const tx = await withdraw.wait();
  const value = tx.events[0].args[0]
  const depositor = tx.events[0].args[1];
  const recipient = tx.events[0].args[2];

  const balanceAfter: any = await klayBank.getBalance(_depositor1);
  const recBalanceAfter: any = await klayBank.getBalance(signer[1].address);

  expect(Number(balance.toString()) - Number(value.toString())).to.equal(Number(balanceAfter.toString()))
  expect(Number(recipientBalB4.toString()) + Number(value.toString())).to.equal(Number(recBalanceAfter.toString()))
  expect(_depositor1).to.equal(depositor);
  expect(signer[1].address).to.equal(recipient)
});


it("Should revert when transferring to Address Zero", async function () {
  const signer = await ethers.getSigners();
  const _depositor1 = signer[0].address
  const _depositorSigner = await ethers.getSigner(_depositor1);

  await expect(klayBank.connect(_depositorSigner).withdraw(ethers.constants.AddressZero, "5000000000")).to.be.revertedWith("KlayBank: Cannot Send to Address Zero");
});

it("Should revert when transfer amount is greater than balance", async function () {
  const signer = await ethers.getSigners();
  const _depositor1 = signer[0].address
  const _depositorSigner = await ethers.getSigner(_depositor1);

  const balanceB4: any = await klayBank.getBalance(_depositor1);

  const balance: any = await klayBank.getBalance(_depositor1);
  await expect(klayBank.connect(_depositorSigner).withdraw(signer[1].address, balance.toString() + "1000000")).to.be.revertedWith("KlayBank: Insufficient Balance");
  expect(await klayBank.getBalance(_depositor1)).to.equal(balanceB4)
});

});
Test walkthrough
After successfully importing the needed packages like chai and ethers, let us take a quick look at the test code below:
- describe : is a Mocha function that allows you to organize your tests. Having your tests organized makes debugging them easier. The describe function comprises of the name of a section of your test suite, and a callback. The callback must define the tests of that section. Mocha has four functions that let you hook into the test runner’s lifecycle. These are: before, beforeEach, after, afterEach.
They’re very useful to set up the environment for tests and to clean it up after they run. A common pattern is to declare some variables and assign them in the before and beforeEach callback.
beforeEach: will run before each test, re-deploying the contract every time. It receives a callback, which can be async.
it is another Mocha function. This is the one you use to define your tests, it receives the test name and a callback function.
Testing increase in user balance on deposit
   it("user balance should increase on deposit", async function () {
  const signer = await ethers.getSigners();
  const _depositor1 = signer[0].address
  const _depositorSigner = await ethers.getSigner(_depositor1);

  const balance: any = await klayBank.getBalance(_depositor1);

  const option = {value: ethers.utils.parseEther("1")}
  const deposit: any = await klayBank.connect(_depositorSigner).deposit(option);
  const tx = await deposit.wait();
  const value = tx.events[0].args[0];
  const depositor = tx.events[0].args[1];

  const balanceAfter: any = await klayBank.getBalance(_depositor1);

  expect(Number(balance.toString()) + Number(value.toString())).to.equal(Number(balanceAfter.toString()))
  expect(_depositor1).to.equal(depositor)
});
The line const signer = await ethers.getSigners() gets the provided hardhat signers
The line const balance: any = await klayBank.getBalance(_depositor1) gets the balance of the depositor before depositing.
The line const deposit: any = await klayBank.connect(_depositorSigner).deposit(option); calls the contract deposit function and deposits the 1 ether.
The line const balanceAfter: any = await klayBank.getBalance(_depositor1) gets the balance of the depositor after the deposit. It then expect the balance + amountDeposited(value) to be equal to balanceAfter.
- Testing reversion on withdrawing to Address zero
  it("Should revert when transferring to Address Zero", async function () {
  const signer = await ethers.getSigners();
  const _depositor1 = signer[0].address
  const _depositorSigner = await ethers.getSigner(_depositor1);

  await expect(klayBank.connect(_depositorSigner).withdraw(ethers.constants.AddressZero, "5000000000")).to.be.revertedWith("KlayBank: Cannot Send to Address Zero");
});
The line await expect(klayBank.connect(_depositorSigner).withdraw(ethers.constants.AddressZero, "5000000000")).to.be.revertedWith("KlayBank: Cannot Send to Address Zero") calls the withdraw function by passing in address Zero which is supposed to revert. It expects it to revert with the error message declared in the contract code.
Running Test
Open up a new terminal and run
npx hardhat test test/index.ts --network localhost
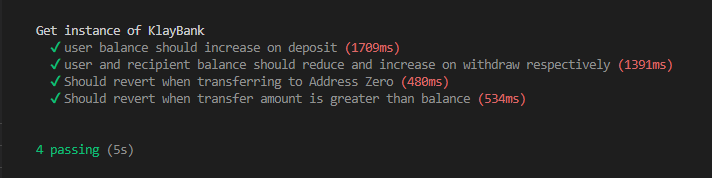
Yay!! our test passed 💃🎉
Deploying and Interacting with our Contract
Now that we have compiled and tested our contract, we can now deploy our contract to baobab
Navigate to contracts/deploy.ts, copy and paste the code below
  // We require the Hardhat Runtime Environment explicitly here. This is optional
// but useful for running the script in a standalone fashion through `node <script>`.
//
// When running the script with `npx hardhat run <script>` you'll find the Hardhat
// Runtime Environment's members available in the global scope.
import { ethers } from "hardhat";

async function main() {
  // Hardhat always runs the compile task when running scripts with its command
  // line interface.
  //
  // If this script is run directly using `node` you may want to call compile
  // manually to make sure everything is compiled
  // await hre.run('compile');

//   run this first to get the contract address
//   after getting the contract address,
//   you can comment it out and past your address in line 25(address argument)
  const Bank = await ethers.getContractFactory("KlayBank");
  const bank = await Bank.deploy();
  await bank.deployed();
  console.log("Bank deployed to:", bank.address);

}

// We recommend this pattern to be able to use async/await everywhere
// and properly handle errors.
main().catch((error) => {
  console.error(error);
  process.exitCode = 1;
});
We are leaving localhost to testnet this time, run the command below to deploy
npx hardhat run scripts/deploy.ts --network klaytn

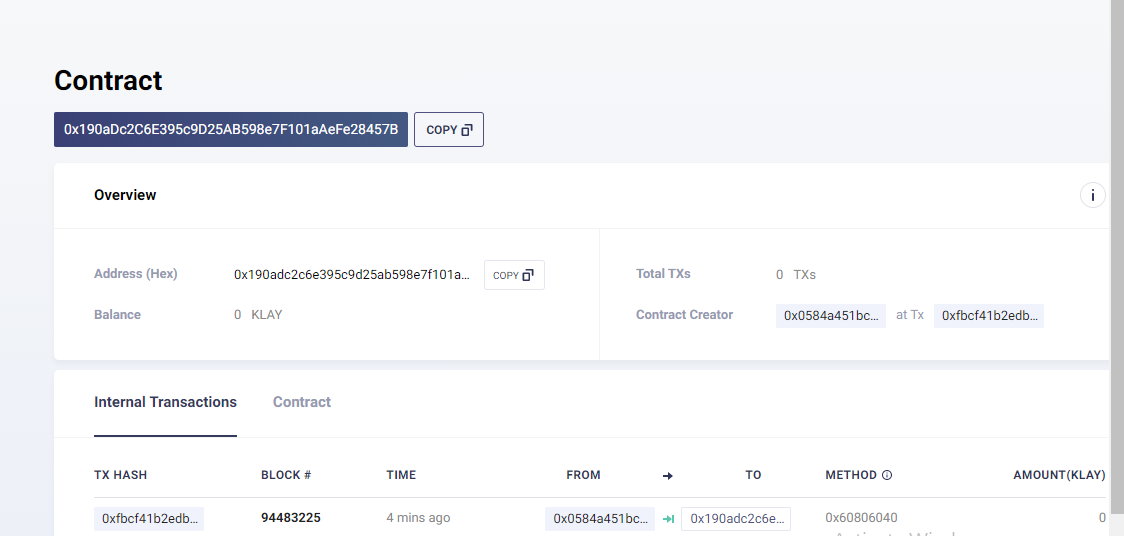
Paste your contract address on KlaytnScope to confirm your transaction. This is mine below 👇
Interacting with your deployed smart contract
// We require the Hardhat Runtime Environment explicitly here. This is optional
// but useful for running the script in a standalone fashion through `node <script>`.
//
// When running the script with `npx hardhat run <script>` you'll find the Hardhat
// Runtime Environment's members available in the global scope.
import { ethers } from "hardhat";

async function main() {
  // Hardhat always runs the compile task when running scripts with its command
  // line interface.
  //
  // If this script is run directly using `node` you may want to call compile
  // manually to make sure everything is compiled
  // await hre.run('compile');

//   run this first to get the contract address
//   after getting the contract address,
//   you can comment it out and past your address in line 25(address argument)
  // const Bank = await ethers.getContractFactory("KlayBank");
  // const bank = await Bank.deploy();
  // await bank.deployed();
  // console.log("Bank deployed to:", bank.address);

  const depositorsAddr = "the address with the private key in your .env"
  const depositor1 = await ethers.getSigner(depositorsAddr);
  const bankInstance = await ethers.getContractAt("KlayBank", "0x190aDc2C6E395c9D25AB598e7F101aAeFe28457B");

  const bal4  = await bankInstance.getBalance(depositorsAddr);
  console.log(`balance of depositor1 before is ${bal4}`);

  const option = {value: ethers.utils.parseEther("1")}
  const deposit = await bankInstance.connect(depositor1).deposit(option);
  const tx = await deposit.wait();
//   console.log(tx);

// Note you can change this address to another live address
 const beneficiaryAddr = "0x2792f4C16F124942886DF20f3C5B4c2cB195aEe2"
 const balAfter  = await bankInstance.getBalance(depositorsAddr);
 console.log(`balance of depositor1 after is ${balAfter}`);

 const balBenerficiaryb4  = await bankInstance.getBalance(beneficiaryAddr);
 console.log(`balance of beneficiary before is ${balBenerficiaryb4}`);

 const withdraw = await bankInstance.connect(depositor1).withdraw(beneficiaryAddr, "5000000000")
 const tx2 = await withdraw.wait();
//  console.log(tx2);

 const balBenerficiaryAfter  = await bankInstance.getBalance(beneficiaryAddr);
 console.log(`balance of beneficiary after is ${balBenerficiaryAfter}`);

 const balDepositor1AfterWithdrawal  = await bankInstance.getBalance(depositorsAddr);
 console.log(`balance of depositor1 after  withdrawal is ${balDepositor1AfterWithdrawal}`);


}

// We recommend this pattern to be able to use async/await everywhere
// and properly handle errors.
main().catch((error) => {
  console.error(error);
  process.exitCode = 1;
});
Now to interact with the contract run the deploy scripts again
npx hardhat run scripts/deploy.ts --network klaytn
The result would be displayed in your console 💪👩💻
We have successfully written, compiled, tested and deployed our smart contract using hardhat considering Klaytn fixed gas price model.
Now let's consider sending a transaction using ethers js putting in mind the klaytn fixed gas price model
Sending a transaction using ethers js
Now let us navigate to our scripts folder and create a new file
scripts/ethersTx.ts
Copy and paste this code into your newly created file
  // We require the Hardhat Runtime Environment explicitly here. This is optional
// but useful for running the script in a standalone fashion through `node <script>`.
//
// When running the script with `npx hardhat run <script>` you'll find the Hardhat
// Runtime Environment's members available in the global scope.
import { ethers } from "hardhat";
import * as dotenv from "dotenv";
import { BytesLike } from "ethers/lib/utils";


dotenv.config();


async function main() {
const account = "0x2792f4C16F124942886DF20f3C5B4c2cB195aEe2";
const url = process.env.KLAYTN_URL;
// @ts-ignore
const priv : BytesLike = process.env.PRIVATE_KEY;
const provider = new ethers.providers.JsonRpcProvider(url)
const wallet = new ethers.Wallet(priv, provider)

const tx = await wallet.sendTransaction({
           to: account,
           value: 90000000000,
           gasPrice: 250000000000,
           gasLimit: 21000,
       })

const receipt = await tx.wait()
console.log(receipt);


}

// We recommend this pattern to be able to use async/await everywhere
// and properly handle errors.
main().catch((error) => {
  console.error(error);
  process.exitCode = 1;
});
Code walkthrough
The line const wallet = new ethers.Wallet(priv, provider) sets the instance of the wallet given a private key and a provider.
The line
const tx = await wallet.sendTransaction({ to: account, value: 90000000000, gasPrice: 250000000000, gasLimit: 21000, })
sends a transaction to the network. Note we set our gasPrice to Klaytn fixed gas price 250000000000
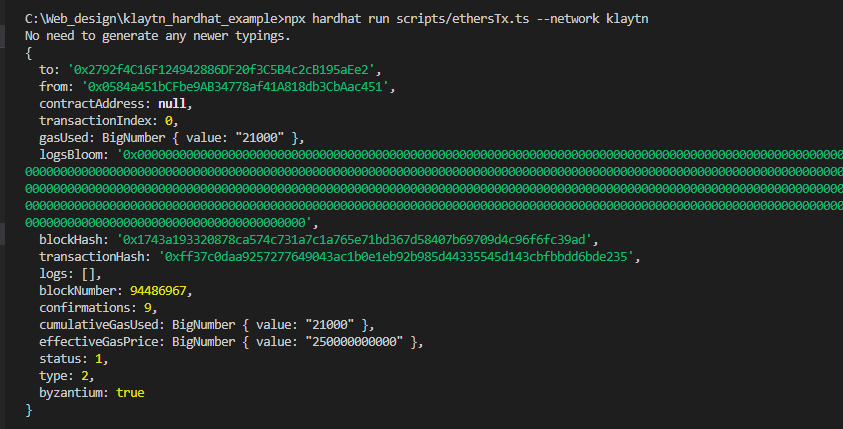
Lets run this code
npx hardhat run scripts/ethersTx.ts --network klaytn
Without setting the gasPrice to 250000000000 we get this error
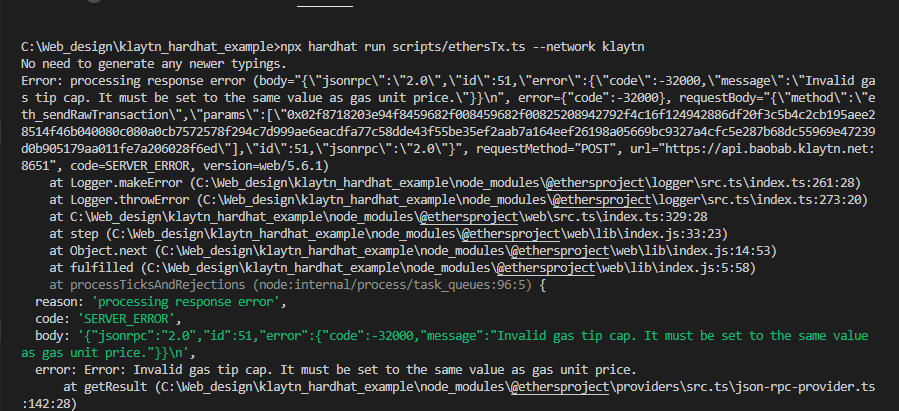
When we set the gas price to the fixed gasPrice, our transaction becomes successful
Conclusion
Congratulations for making it until the end and for setting up your klaytn Hardhat project
This was a very comprehensive tutorial on writing, compiling, testing, and deploying our solidity smart contract to Klaytn Baobab using Hardhat and Ethers js considering Klaytn fixed gas price model. You can read more about Klaytn support for Ethereum equivalence here
You can check out the complete source code here on github
If you have any questions, suggestions or comments, drop them below, or reach out to me on Twitter!
Happy Buidling!!!!


